My Other Math Sites
Lessons From the Classroom
A Routine for Between 2 Numbers
I hadn’t realized the last few entries of between2numbers.com were left blank. They are done now. Thought I’d share a more revised warmup routine of how I’ve used the contents.
I’ll use entry #1 as an example.
I project the two images only and set the timer for 30 seconds for quiet notice-and-wonder. No writing necessary during this time.
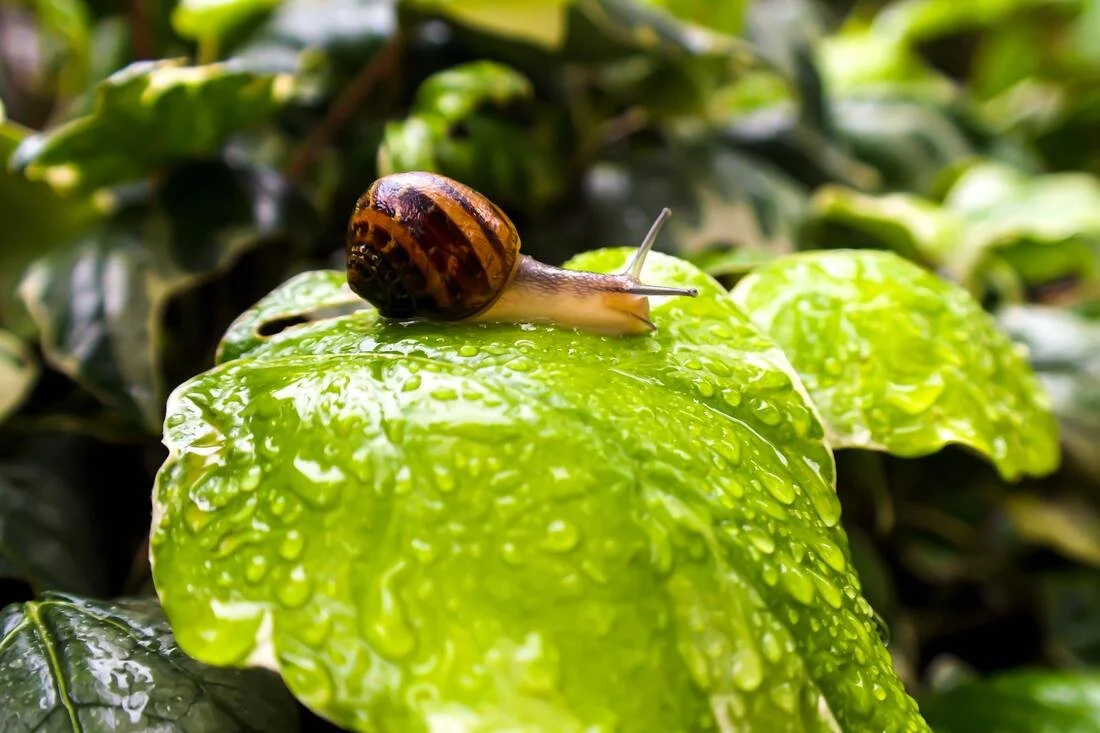
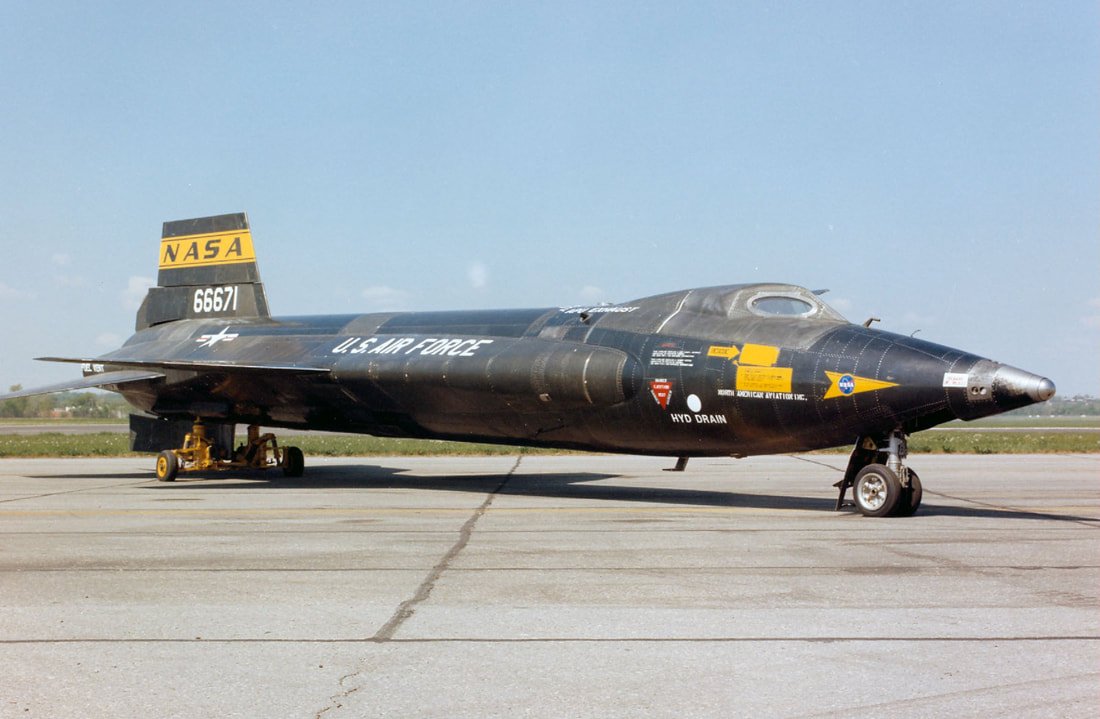
I then say, “Before I show you the speed of each of these, I’d like you to discuss with a neighbor what the numbers might be, let’s think miles per hour.” I ask them to write down their estimates [in a journal]. Set the timer for another minute.
I call randomly on two students to tell the class what their guesses are for the snail. Call on two more students for their guesses for the jet. I record these on the board.
Now I reveal the snail’s rate and ask, “Who has the closest guess to this?” Record their answers. This is a good opportunity for students to check their decimal comparison.

Now I reveal the jet’s rate and ask for the same.

I entertain any other related information at this point. I might ask them if they knew what the average speed of a passenger airplane was. Then, I reveal the question.

Okay, this step is important. It saves time writing and fussing over actual quantities, and I find that it helps students focus on the mathematical operation rather than feel anxious about the numbers. I say, “We’re going to let the snail’s rate be A, the jet’s rate be B, and the distance 2,800 miles be C…”

“... Discuss with your neighbor what calculation(s) you would do to find out how much time it takes each object to travel across the US. Just use the letters now. For example, if you wanted to add the two rates, you’d just write A + B.” Set the timer for one minute.
Randomly call on one group to share. Record on the board what they share and ask, “Who has a different solution?” Write down what they say. Continue asking until I have recorded all the different solutions. (Normally, there are usually just 2 or 3 different ones.)
I now take out a calculator and get an answer for each of the solutions shared. I go back to the owners of each solution and ask, “What unit should your answer have?” (If the units were not mentioned earlier.) We discuss the reasonableness of the correct answer.
I’m proud of this site because the routine affords several of these:
interesting facts
estimating
talking and listening
proportional reasoning
unit rates
dimensional analysis
Here is the key. Please share this resource widely, and if you use it, please let me know how it goes.
Math Worksheets
I often create worksheets for my students, even though every district-adopted math curriculum we've had has worksheets for students. I do this for two reasons:
I sometimes want to teach differently than what the curriculum writing team was thinking.
There's a particular structure/scaffold that reflects how I see the content can unfold for learners.
Here's a sequence of practice questions for my 8th graders on rigid transformations.
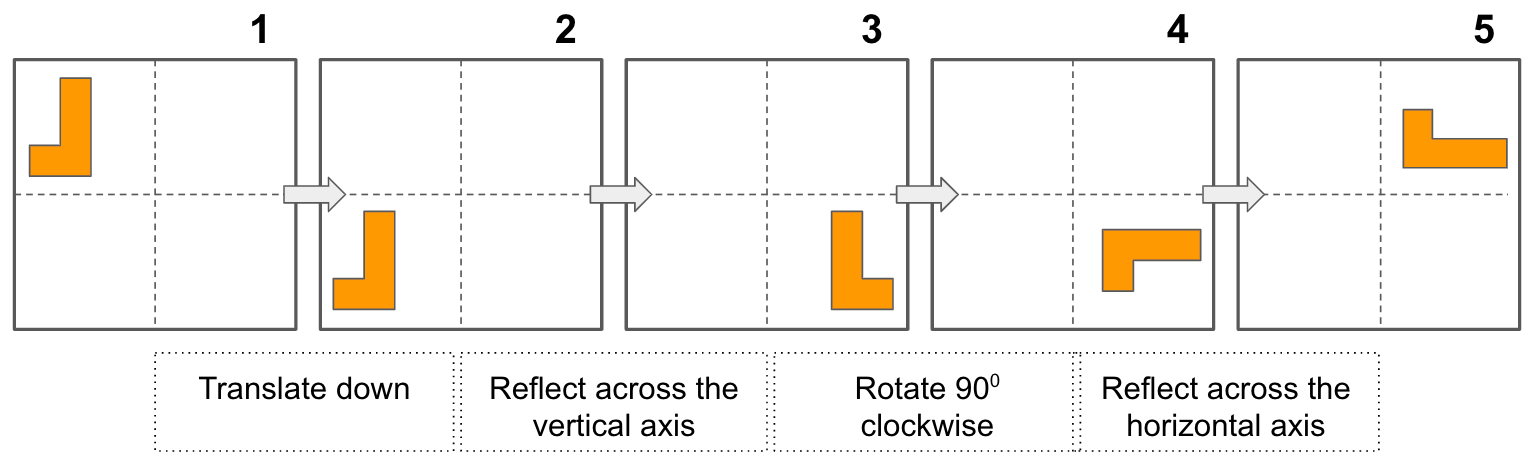
Everything about this is intentional.
Item #1 is a completed sample of what's to come. This is a practice worksheet, not a problem-solving task, so I will be clear about what is expected.
I remove certain parts in item #2, while keeping it similar to item #1.
Item #3 comes before item #4 because I think it's easier to follow the stated transformations than to say what they are.
Item #6 asks for more flexibility but with an ending constraint.
Item #7 opens up the problem and allows for peer exchange.
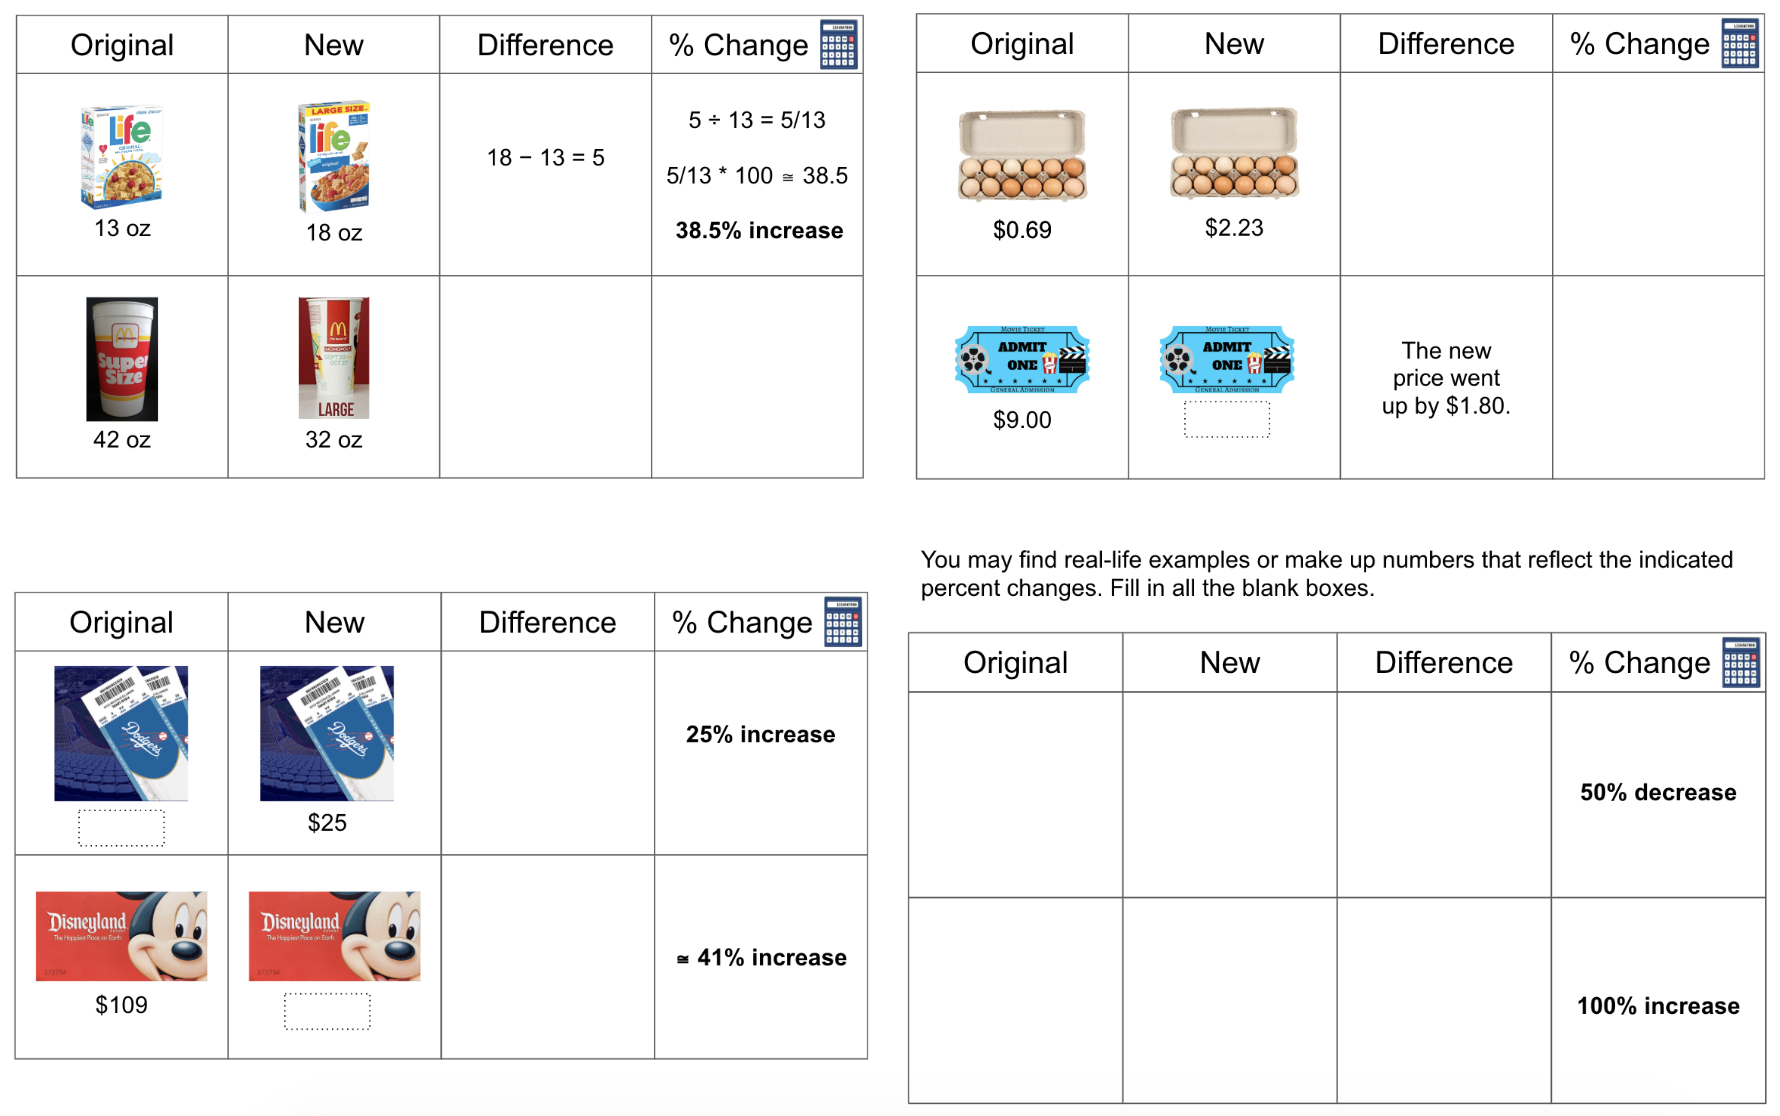
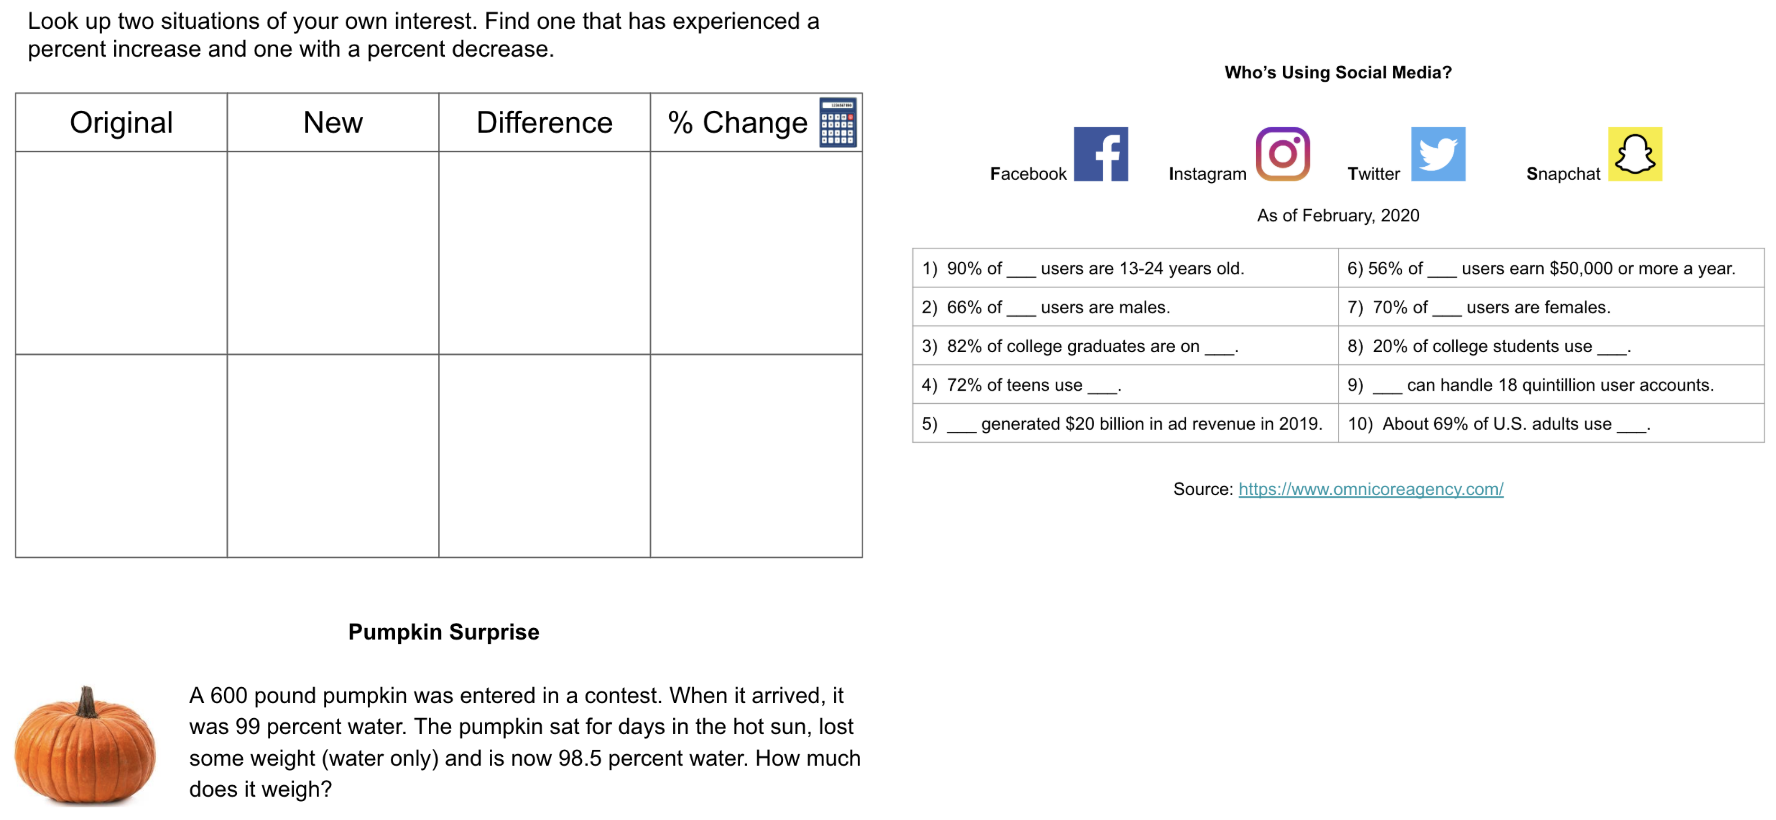
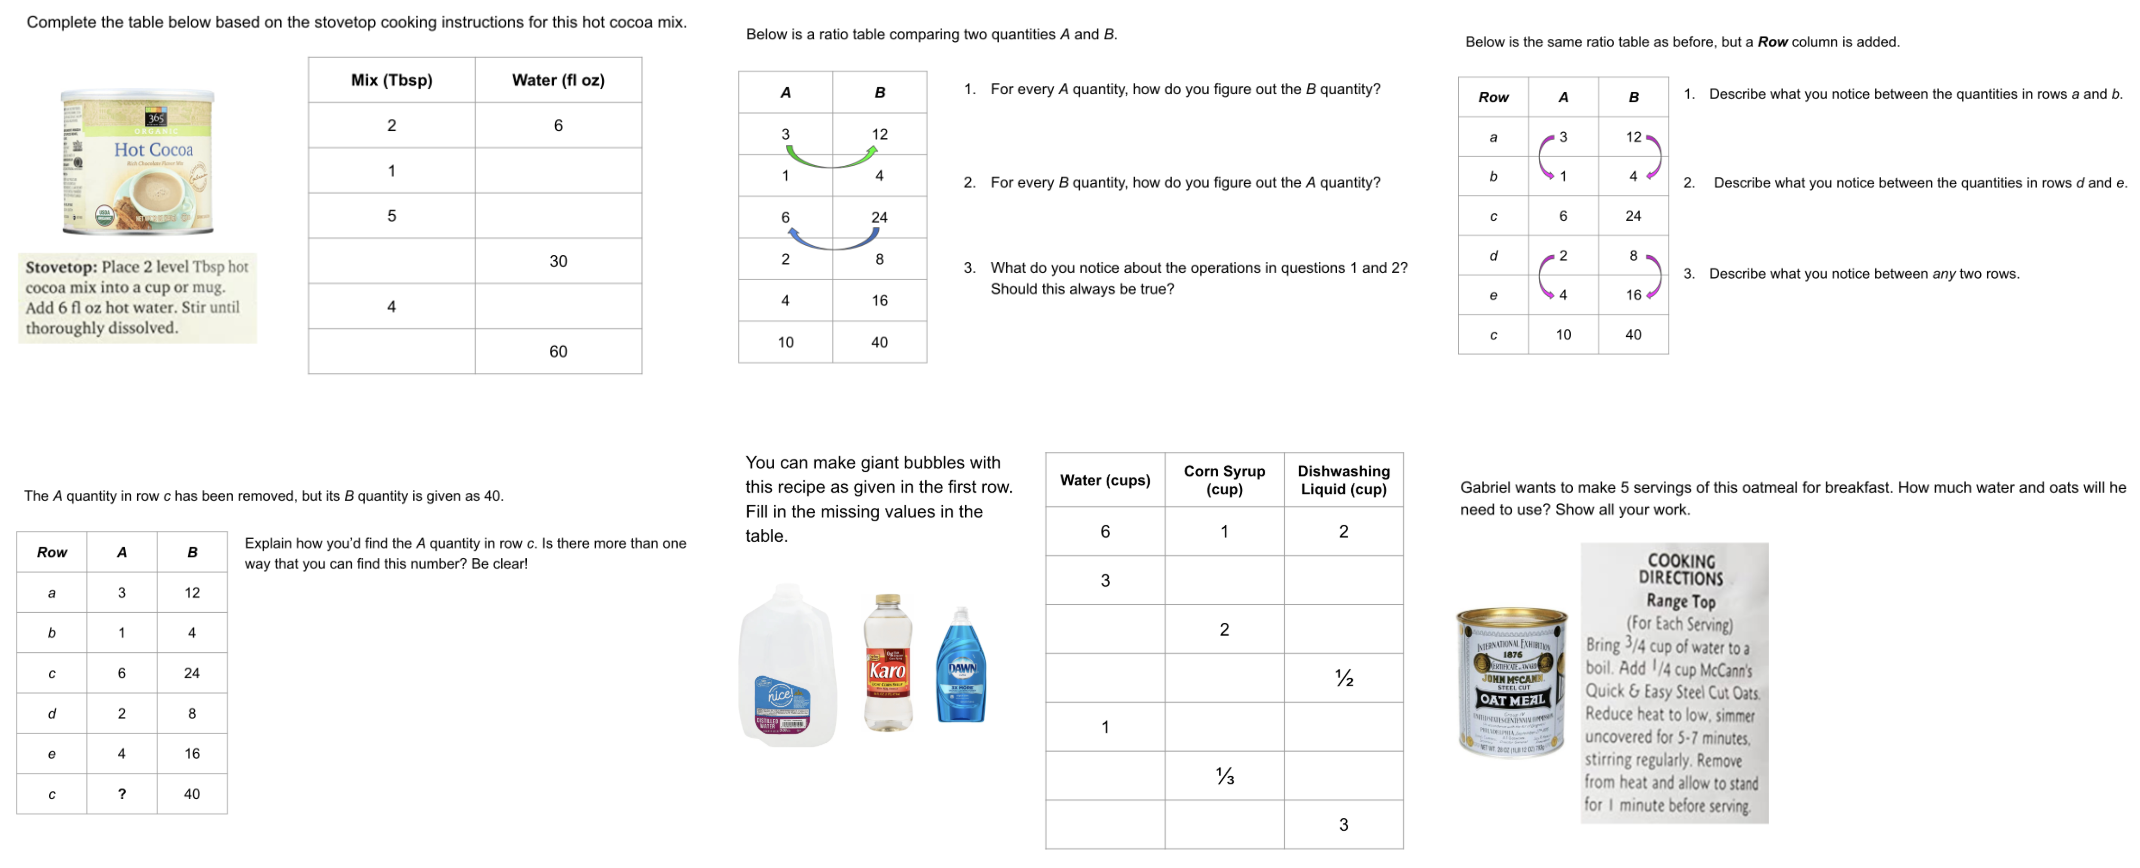
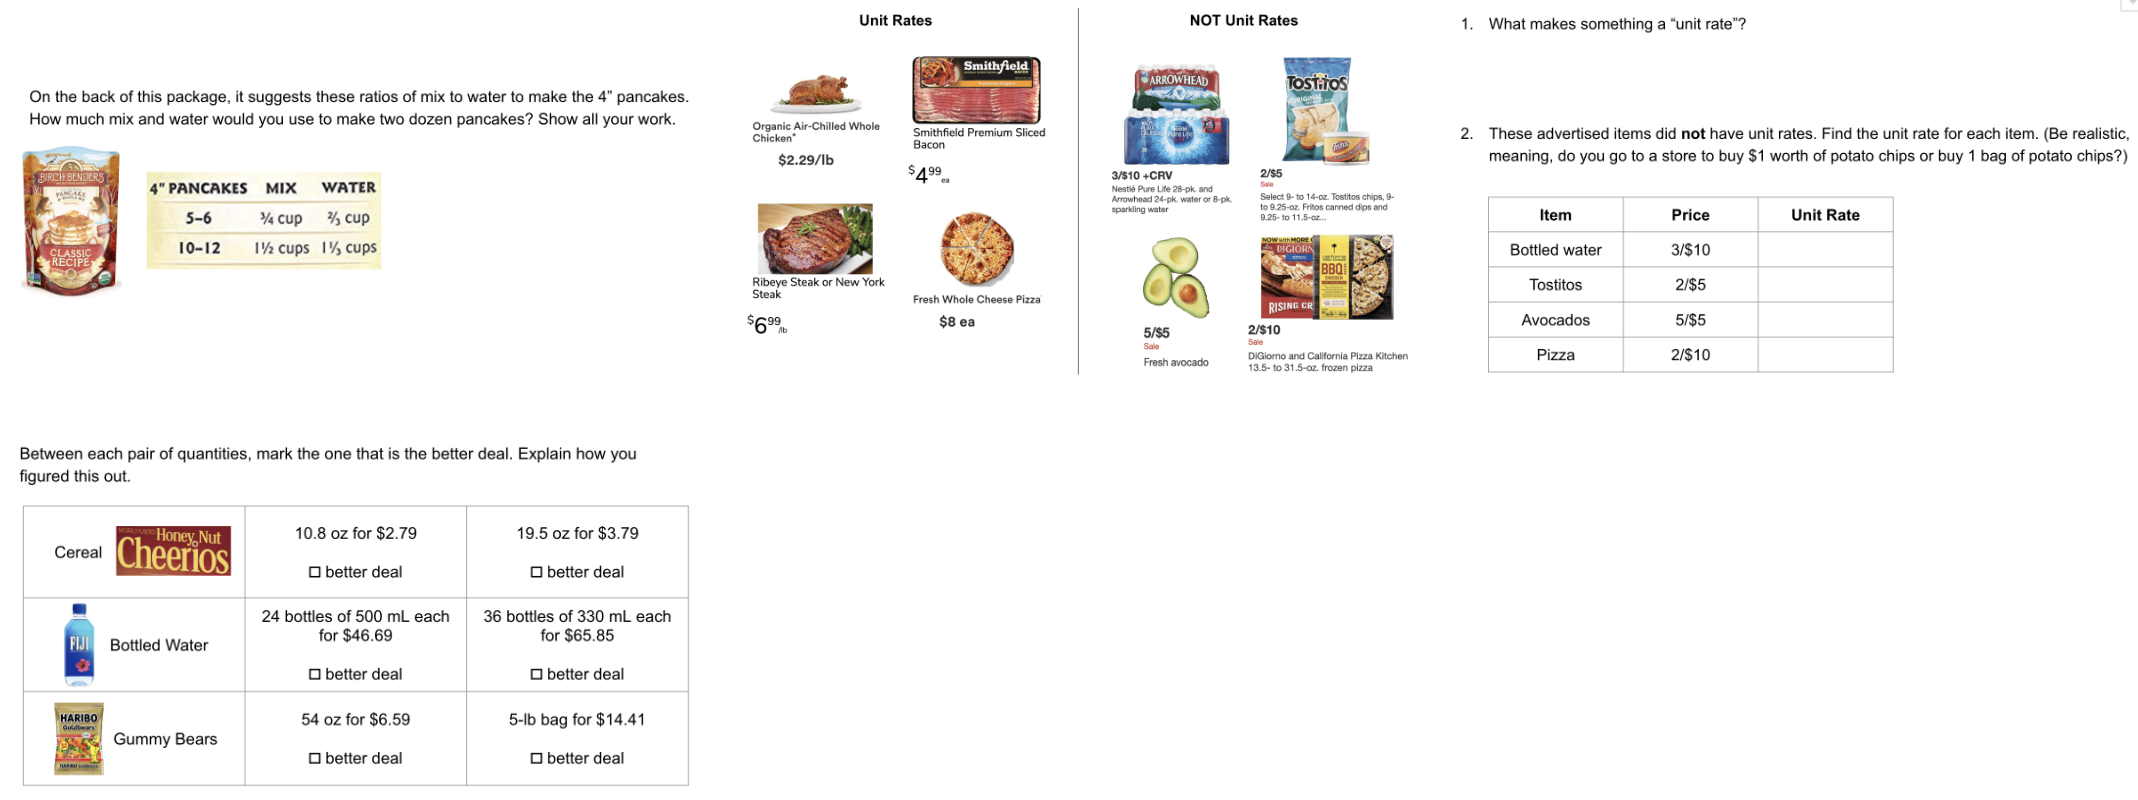
It's esthetically easier for me to create the questions on Google Slides. I then do screenshots to toss them onto a Google Doc. Here's a screenshot of questions for 7th graders on percent change. Here's a screenshot of questions for 6th graders on ratios and rates. If you'd like copies of these:
Yes, each of these takes one unit of shit-ton of time, especially when I have to look up real products with real numbers. But it's an OCD thing too, as in If-I-can-make-it-better-I-will. Stay safe, everyone.
Reversing the Question
Don Steward posted this on Sunday. Like Don, I really like this task and also think it has a certain Malcolm Swan je ne sais quoi about it.
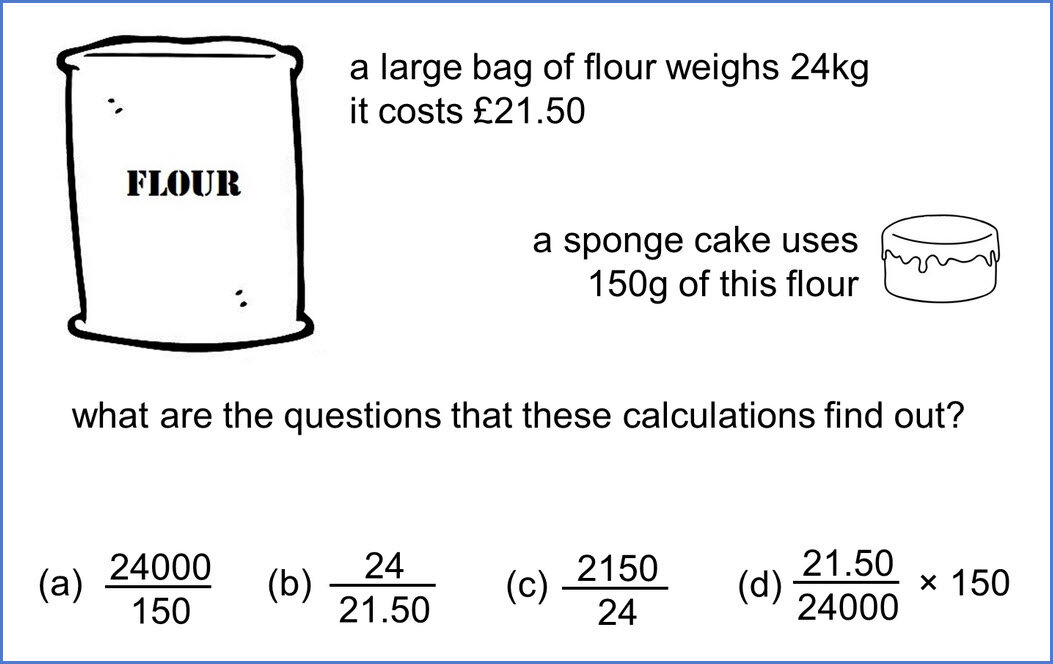
I showed only the top part to my 6th graders, and I gave them 2 minutes to write down what they noticed.

In addition to noticing the given information, the students also mentioned:
It takes a lot of grams to make a sponge cake.
A kilogram must have a lot of grams in it.
The unit of measurement is changed in the cake and in the big bag.
This problem doesn't have a question.
The sponge cake has no price.
There is frosting on the cake.
You need to change the measurements first (kg - g)
The cake weighs more.
The cake is really small and the flour is really big.
Not much information and there's no question.
There is no question.
The weight of the bag is in kg but the flour it takes for the cake is in g.
You have to convert 24 kg to grams.
It uses only very little of the flour.
I gave them another 2 minutes to write down what they wondered.
How much the sponge cake costs.
How many sponge cakes can you make.
How big is the sponge cake.
How to convert from kg to g.
If the sponge cake is good.
24 kg is <, =, or > 150 g.
What we are going to have to solve.
Is the question going to be about if there's enough flour or is it going to make us change it from kg to g.
How much 24 kilograms is in pounds.
How many grams are in a kilogram?
How many krumkakes can you make with the bag of flour.
How long will it take for the cake to be ready.
What a sponge cake is and what the recipe is for the cake.
How much flour is left.
What flavor is the cake. (Sorry. I'm hungry!)
What you're wondering that I'm wondering about.
What the question is, and if there are more ingredients.
If we will have to find the price for the sponge cake, or maybe we have to find out how much half as much flour is worth.
Then we moved on to next part of providing questions that would go with the calculations. This was so very tough for my kids. While 21 of 31 kids could come up with the correct question for part (a), they were lost with what to write for the other three parts.
Because we didn't care what the numerical answers were, the kids didn't do any calculations, instead they were supposed to focus on the operation(s) in each problem and decide on the question that would prompt a specific operation.
The most common question for part (b) was, "How much does 1 kg of flour cost?" (I'd swapped out £ for $.)
Then my next step would be for them to go ahead and use a calculator to get the numerical answers. They will see that for part (b), 24 divided by 21.50 equals approximately 1.12. And if 1.12 were the cost for 1 kg of flour, then 24 kg of flour should cost more than $24. But, wait. We already know that the bag of flour costs $21.50. Hopefully they'll arrive at this contradiction on their own, and re-think their question.
We'll then attach the units to the numbers accordingly and let the conversations continue. When kids tell me that they will calculate two numbers using operation w, I always follow up with, What does your answer mean? What unit or units does it carry?
Too often kids have trouble with word problems. Too often they don't know what to do with two numbers let alone a bunch of numbers. They guess at division when one number is big and one is small. They add when they see two fractions. They multiply because that was how they solved the last word problem.
I will also do this with my 8th graders because I suspect they will have trouble too. And this is exactly the kind of trouble we need to get into. Now rather than later. This task gets them thinking about ratios — which is like the most important math thing in all of the math things.
Steward is exactly right about this task. And I'm thankful he shared.
It was used as a fine example of how reversing the question can often lead to a more challenging task.
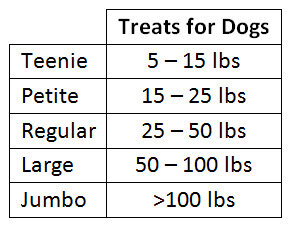
Greenies
Our black lab Mandy is 3.5 years old, weighs a ton, and her breath used to smell like death. Until we started giving her one Greenies a day. My husband orders them from Amazon, he also gets them for our neighbor's small dog Bailey.
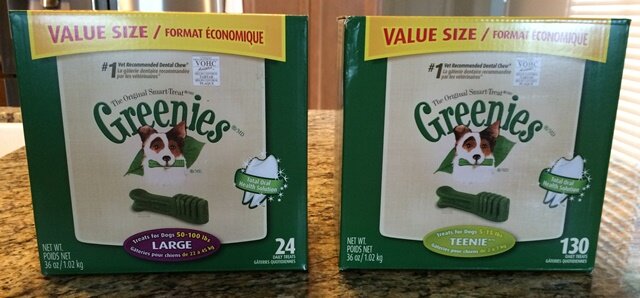
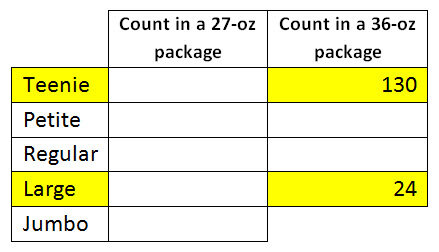
Although both boxes weigh the same 36 ounces, Bailey gets 130 treats in the Teenie size and Mandy gets only 24 in the Large size. This caught my attention which led to this task with my 8th graders who happen to be working with similar shapes. (Like I had planned this all along.)
Greenies are sold in various size packages. I'm interested in the 27-oz and 36-oz.
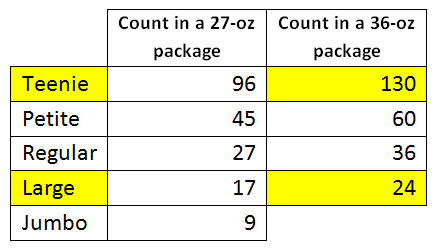
To launch the task, I hold up the 2 treats: 1 Large and 1 Teenie. I tell them that there are 24 Large ones in a 36-oz package, and I want them I guess how many Teenie ones are in a 36-oz package.

Then I give the students these:
The photo of the 2 packages (so they know only the highlighted information in the table above).
Each group of 3 students get two real treats: 1 Large and 1 Teenie.
In return, the students need to give me these:
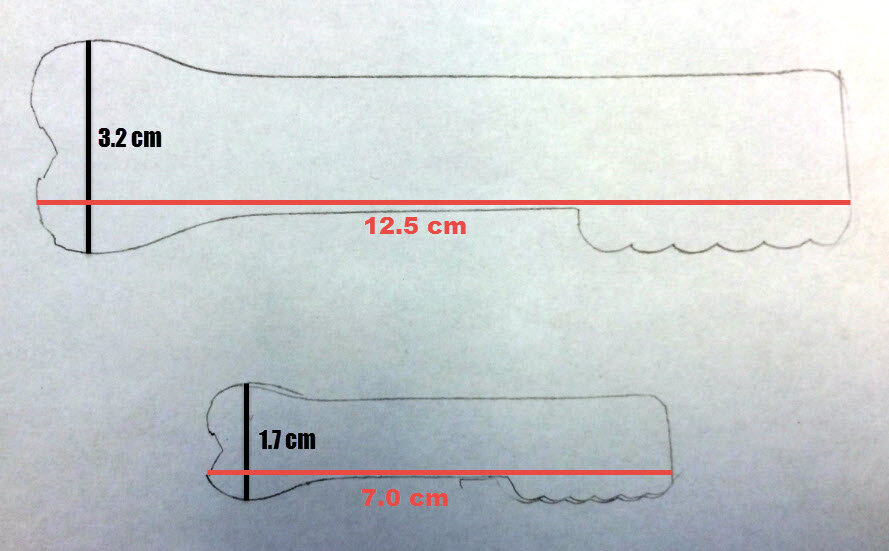
A 2-dimensional outline (with dimensions labeled) of what a Petite, a Regular, and a Jumbo may look like. For example, these are the actual outlines of the Large and Teenie. They may write down the thickness also.
A completed table with the missing counts filled in.
Highlights of this task:
Kids use some known information to construct new information. They use modeling to figure out what the other sizes may look like and how many of them would fit in a 27-oz or 36-oz package.
It's kinda messy and weird. While the kids can measure whatever lengths of a treat, how do these numbers translate into the mass of each treat?
It's good to work with solid objects instead of just flat polygons when learning similar shapes.
The reveal (Act 3) of something like this is always a lot of fun. Not only the reveal in the count per package, but also how close their outline sketches are to the actual treats when I bring in the Petite, Regular, and Jumbo.
How much does a 36-oz package cost?
Is the Jumbo a shot in the dark? Would kids think to ask me for the size of the dogs? How does this help, if at all?
Technology and Construction Papers are Cool
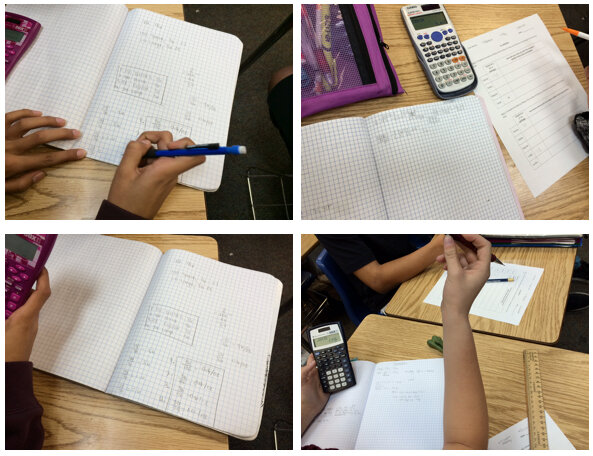
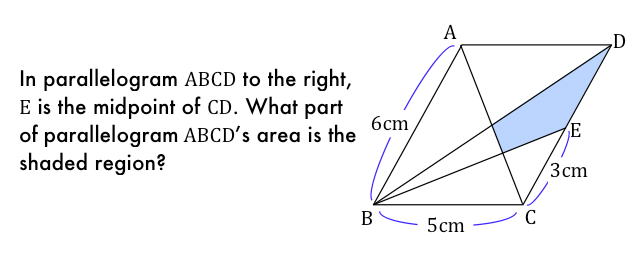
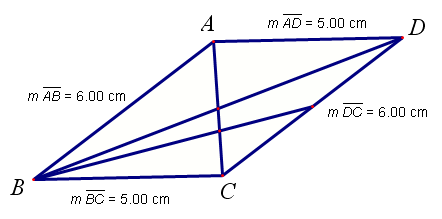
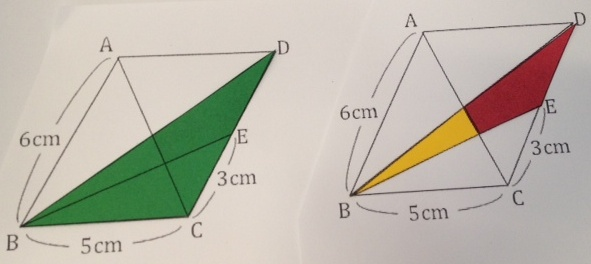
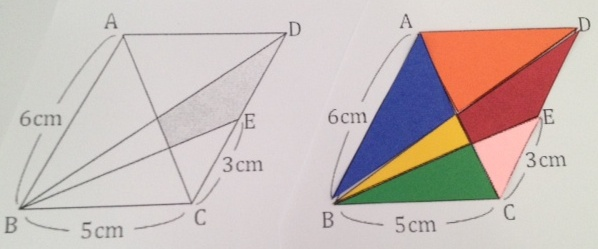
Big-time struggles for my 8th graders on this problem from Five Triangles mathematics.
The one student who got it also struggled, but he was good about our rule of "never tell an answer." What I gathered from seeing their boards and listening to them explain:
They wanted to find the area of the parallelogram first.
So they needed to find the height.
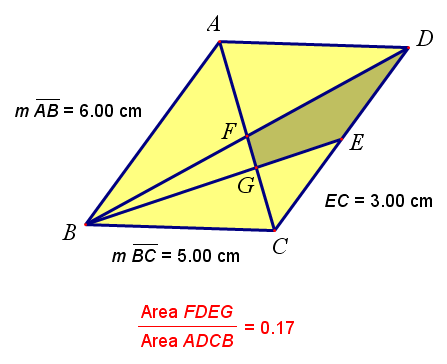
To find the height, they reasoned that triangle ABC was isosceles, making the perpendicular bisector AY also be the height of the parallelogram. Then they could use the Pythagorean theorem to find AY. (I can't get AB and DC to be exactly 6.00 cm.)
So I showed them the parallelogram below just to be less helpful and to remind them about assuming something is isosceles because it looks it.
Without a clear way to find the height, frustration mounted.
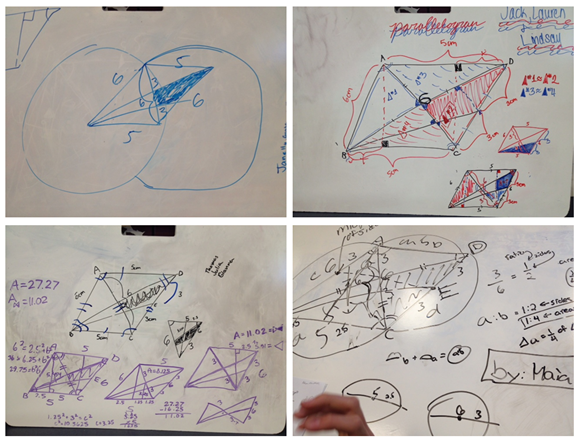
But major props to them for persevering as you can tell from their boards that they tried to dissect the parallelogram into even more pieces in hoping they'd find what the shaded piece would be equal to.
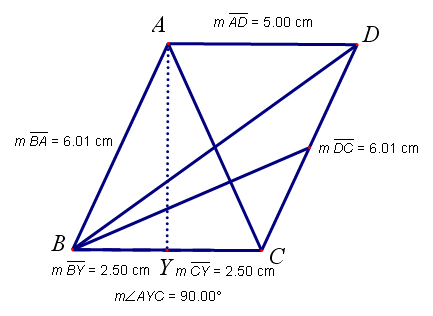
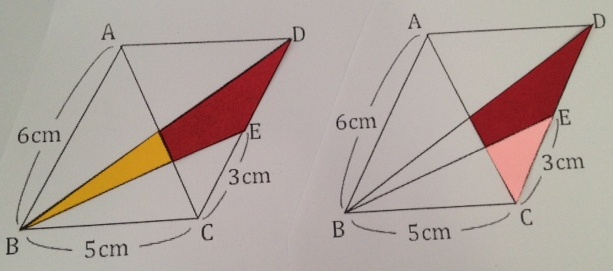
The next day... I let them struggle some more. They weren't seeing the key pieces (at least to me they were key), so I told them to look at the "relationships" among the pieces. They were pretty sure the diagonals of a parallelogram cut it into 4 triangles of equal area. Then they were stuck again. I then asked them to construct this parallelogram using Geometer's Sketchpad (GSP) and find the answer to the question posed. Soon one student asked, "What should the angles be?" I replied, "It doesn't say in the problem, so I don't know. But it is a parallelogram, so make sure you have the same side lengths." Without much trouble, they found the answer. They also realized that even though they may not have created congruent parallelograms among themselves, they all came up with the answer of 0.17 or 1/6.
Me: So why did I ask you to use GSP to do this?
Student: Because we couldn't do it by hand?
M: Maybe. Or maybe you didn't have enough time. But why do we use GSP in general? What's the difference between doing a construction by hand and doing it using GSP?
S: So we can move things around.
M: Right! It's dynamic! Then this is what I want you all to do. Move things around. Drag the side lengths. Change the side lengths. But while you're doing all this messing around with the parallelogram, I want you to pay attention to the numbers, the measurements.
Not long before many of them chimed in excitedly: The ratio doesn't change! I came by each kid's screen to check their work. (These are my reconstructions of some that I saw.)
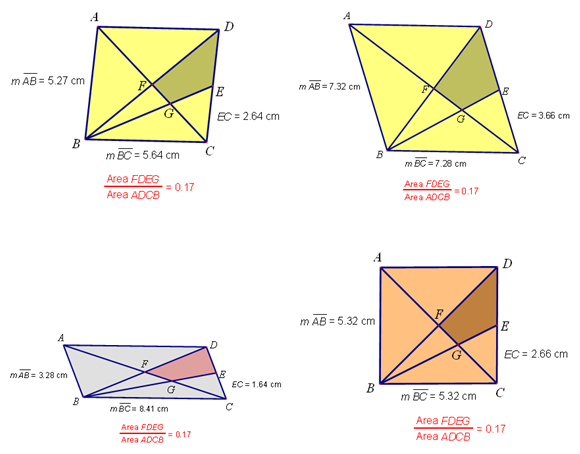
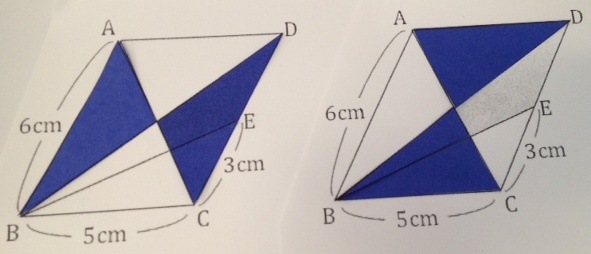
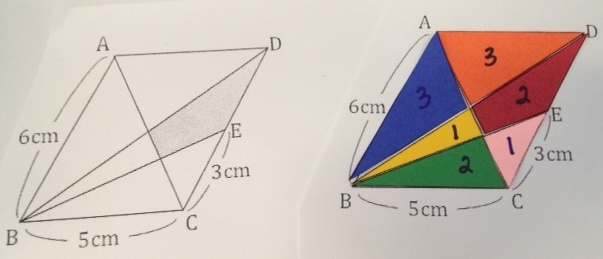
To make the most of their construction (and a good problem), I then asked them to find the ratios among all the pieces that they saw. I wish you could hear them. A bunch of them kept making the same exclamations: So cool! Mind blown. While only one student found the solution by hand, the rest of them felt pretty good about their construction of parallelograms, and they discovered important relationships among the pieces. Technology came to the rescue. Here's how I used colored construction papers to help students see the relationships better.
Advantages:
Instead of having to write down or say "triangle ABC," "triangle BEC," or "quadrilateral FDGE," I can just refer to each one by color.
By not having to follow the letters of ABC or GCE, kids can focus on the visuals and see the relationships more quickly.
I can show congruence by placing one piece on top of another.
Something like this:
The diagonals cut the parallelogram into two pairs of congruent triangles. Therefore, each blue is 1/4 of whole. (I reflected each pair so they can see the congruence.)
Below left: green is 1/2 of whole.
Below right: red + yellow = 1/2 of green, or 1/4 of whole, because they share the same height and half the base.
Below right: red + pink is 1/4 of whole (same size as a blue). Since left and right images below are equal in area, and red is red, therefore yellow equals pink.
Blue + yellow (combined) is a similar triangle with pink due to AA postulate. And because their side lengths are 6 to 3, or 2 to 1, then their areas are 4 to 1. Let's call the area of pink as 1, and we learned from above that yellow equals pink, so yellow is also 1. This leaves blue to be 3.
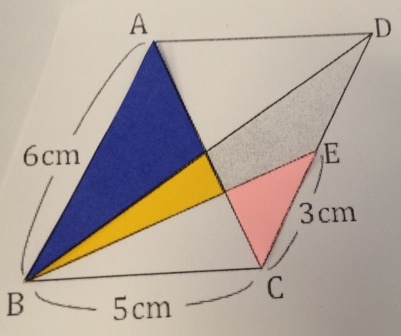
Putting all the pieces together, we have a total area of 12, so the shaded part (red) is 2/12 or 1/6.
Kate
Add to what Robert said, your kids have enough GSP skills to use it to investigate a problem. Kudos! That's a tough trick to pull off. I did it a different way! I found constructing a supporting parallel line dissected the quadrilateral in a helpful way. http://www.geogebratube.org/student/m83241
February 10, 2014 12:10 PMfawnnguyen wrote:
Hi Kate. Yay, beautiful work!! We did this activity just last week and one of the kids asked at the start, "How do you find the area of a non-parallelogram or trapezoid [FDEG] anyway?" I replied, "Well, can you divide that shape into other shapes that you can find the areas for?" So, I saw the groups draw in that parallel line that you have. They were able to find the area of pink triangle as 1/8 of whole but struggled with finding area of blue triangle during their paper/pencil work.Thank you, Kate.
One Rod Tall
I’ve written before about reading books to my kids and following up with an activity. I read the poem One Inch Tall to my 6th graders as we’re studying ratios and proportions.

One Inch Tall
If you were only one inch tall, you’d ride a worm to school.
The teardrop of a crying ant would be your swimming pool.
A crumb of cake would be a feast
And last you seven days at least,
A flea would be a frightening beast
If you were one inch tall.
If you were only one inch tall, you’d walk beneath the door,
And it would take about a month to get down to the store.
A bit of fluff would be your bed,
You’d swing upon a spider’s thread,
And wear a thimble on your head
If you were one inch tall.
You’d surf across the kitchen sink upon a stick of gum.
You couldn’t hug your mama, you’d just have to hug her thumb.
You’d run from people’s feet in fright,
To move a pen would take all night,
(This poem took fourteen years to write—
‘Cause I’m just one inch tall).
Then I asked them to write their own poem in similar fashion (structure and style) using a unit length of their choice other than “inch.”
We agreed on the following guidelines:
minimum 18 lines, however many stanzas, no more than one page
rhyming is fun and recommended, but not necessary
typed up, size 12 font, no funky-impossible-to-read-annoying font
must be illustrated by hand, stick figures are okay as teacher can’t draw either
poem title and heading on paper
objects in the poem must be reasonably proportional
[Original post had more student samples, I’m just sharing one here.]
One Foot Tall
by Caden
If you were one foot tall, you would only be two pencils long
You would be barely taller than a math book
You could ride a big shade hat down a brook
You could sleep in a school backpack
You wouldn’t be able to reach the door handle
If you were one foot tall
If you were one foot tall, a roof would be a cliff
An iMac would be a flat screen TV
A sturdy folder would be a surfboard when riding in ferocious winds
A bathtub would be a hot tub to rest in
A Dalmatian dog would be a horse you could ride away on
If you were one foot tall
If you were one foot tall, a dog’s bed would be a perfect size
A desk chair would be a lounge chair to sit and rest in
The shrubs in the backyard would be a small jungle
A grape would be a plum
A kitchen sink would be a nice bathtub
If you were one foot tall

Speaking of reading and books and math, hot off the press is Nico Rowinsky‘s new ebook, Sally Strange. Nico clearly has a good pulse on middle school kids — he writes with heart and lightness and allows the mathematics to weave ever so gently through the pages. His Sally Strange is an all-too-familiar 7th grader in our classroom. Get it for yourself, for a friend, for a young friend, for your school library (when the hard copy comes out).
Staircase and Steepness
AHHHH, I love how this lesson has turned out so far!!
Today was our 3rd day of State testing, and because I have 8th graders for homeroom, we still have three more days of testing next week. Ick.
I didn't want to cram/review again with my 6th graders today, so I thought of doing a lesson on "steepness" (adapted from Swan and Ridgway).
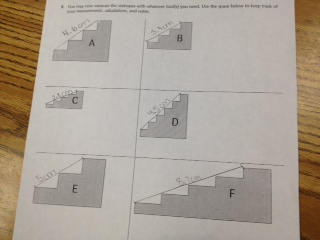
I began the lesson by showing a bunch of images, like these, and asked,
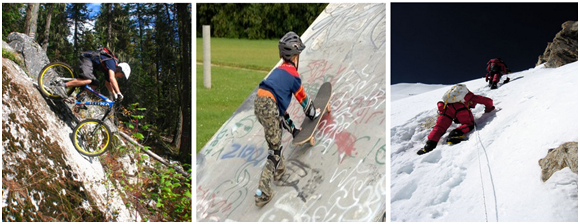
What do you see?
Kids' responses: going down, going up, all using their legs, exercise, at an angle.
Here’s the lesson. I purposely wrote it as if it were unfinished because I didn't want it to end on my terms. I wanted the kids' conversations and discoveries to guide me to closure, if any.
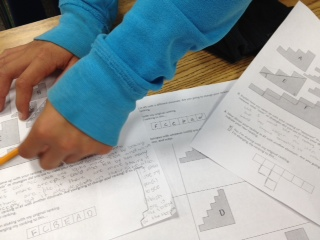
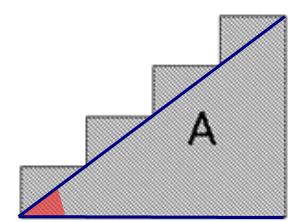
Question 1: Without measuring the staircases, put them in order of "steepness," starting with the shape with the least "steepness."

Question 2: Explain how you came up with your ranking in #1. Because you were asked NOT to measure, what "tools" or strategies did you use to make your decision?
You can see from these photos how they thought of "steepness."
Question 3: Now discuss your ranking in #1 with another classmate. Are you going to change your ranking? If so, please indicate your new ranking.
Question 4: Now discuss your ranking in #3 with a different classmate. Are you going to change your ranking? If so, please indicate your new ranking.
Six students made no change to their original ranking after talking with two other classmates, 16 made one change, and 9 made two changes.
I was already so happy to see how the activity was coming along. I didn't realize how much more I was about to learn from Question 5 and beyond.
Question 5: You may now measure the staircases with whatever tool(s) you need. Use the space below to keep track of your measurements, calculations, and notes.
A few kids asked for a protractor, most used a ruler. Most of those who used a ruler measured this length.
Me: Now that you have these measured, what do the numbers mean
Matthew: (Silent, mumbling...)
Me, pointing to staircase F: I see this has the longest length. Was this your steepest shape?
Matthew: Oh no. D was the steepest.
Me: Okay. Shape C has the shortest length. What does that mean in terms of steepness?
Matthew: I don't think these numbers are right.
I went over to Troi's desk, she too had measured the same lengths as Matthew did.
Troi: These numbers didn't do anything for me.
Me: What makes you say that?
Troi: Well, the staircases are all different sizes, you'd have to make them all the same to compare them.
She then measured the rise of each step. I left her to do so.
Rapha: I'm measuring the height, but it depends on the width too.
She didn't do any more with the two sets of numbers.
Zoe: Can you show me how to use a protractor?
Me: Sure. Which angle do you want to measure?
She pointed to the middle of the staircase. I worked with her for a little while.
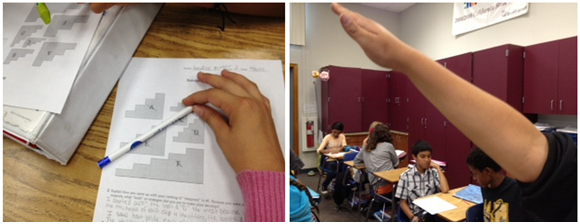
I checked on a small group of boys who seemed to be using the protractors correctly.
Mike: We agree on the rest of the ranking. We're just not sure about B and E. They're like one degree apart.
Ryan, holding up two different brands of protractors: These aren't even measuring the same.
Me: Hmmm. Tools aren't perfect, are they?
I was watching the time; we had 20 minutes left of our 2-period class. I asked them for a "final answer" after whatever measurements they'd done, "Put this ranking at the bottom of your worksheet."
By then the kids who used a ruler had abandoned the tool for the protractor. Make no mistake, these kids were pretty confident that if Ryan and Mike were measuring the angles, then they ought to be doing the same. More importantly, they noticed that the angle measurements correlated with their steepness rankings.
I asked Miles first — just because he sat front row, right side — for his ranking: D A B E C F. I asked if anyone else had the exact same as Miles'. Twenty hands went up. I asked for Moses' ranking: D A E B C F. Ten hands went up for this ranking. That only left Sierra with a different ranking. (Sierra was one of six who never changed her original decision.) Because B and E do have the same steepness, all 30 of 31 kids were correct.
Now what? Somehow ending the lesson here seemed weird, even though we had a lot of good conversations. They used angles to figure out steepness. I hadn't planned this! What about the ruler?!
So I said, What if you didn't have a protractor? What if you only had a ruler? What would you measure instead?
I then defined lengths on the staircase that could be measured with a ruler so we could all speak the same language about what was measured.
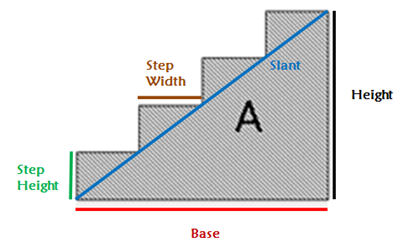
I said, It was great that you figured out steepness using a protractor. But now I want you to figure out how to find steepness using a ruler. Which of these lengths would you measure? Do you need to measure more than one? And if you measured more than one, what would you do with the two/three numbers you have?
They began measuring ferociously, calculators in hands. (Yes, we use calculators all the time!) I didn't see anyone measuring the slant. I got this much from them by walking around and asking:
Base minus height.
Base divided by height.
Base times height.
Height divided by base.
I ended with, For homework, please finish measuring and calculating for all six staircases. Do your calculations support the ranking?
Troi walked up to my desk when most students had already left, Can I change? I already knew... I did base times height. That didn't work.
#peedinmypantshappy
Playing with Barbies
I got most of my 20-plus Barbies from eBay and use them well.
I use the Barbies with my 6th graders when we study proportions. I also use them for Barbie Bungee with my algebra students during our unit on linear equations.
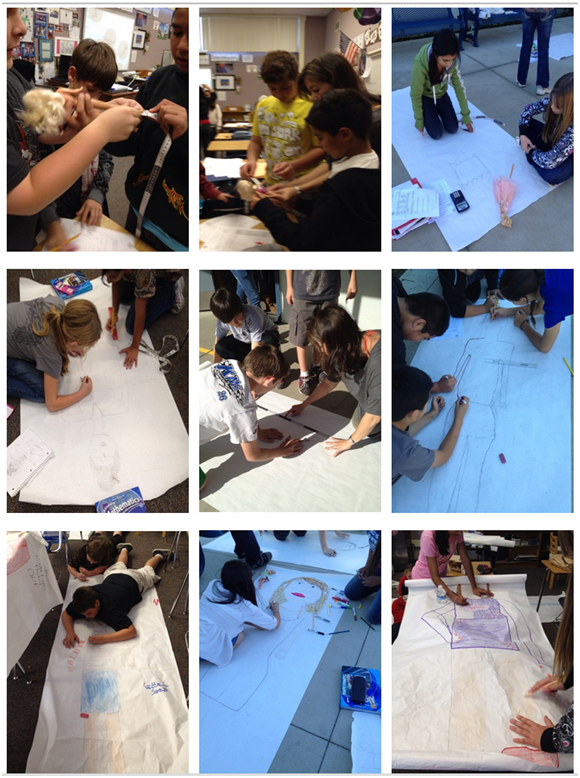
The students work in groups of three—one Barbie per group. They take various measurements of Barbie from head to toe; then, they take the exact same measurements of someone in their group.
(I did this activity with math teachers once, and some were concerned that students might not want to be measured. I've done this activity for the last seven years, and if anything, the kids want to volunteer to have their measurements taken.)
I then assign each group one measured body part—Group 1 has “feet,” Group 2 has “waist-to-ankle length,” Group 3 has “head height,” Group 4 has “legs,” etc. Students then take the ratio of their group's assigned human body part to Barbie's. They multiply all of Barbie's measurements by this ratio and sketch their “humanized” Barbie based on these scaled-up numbers.
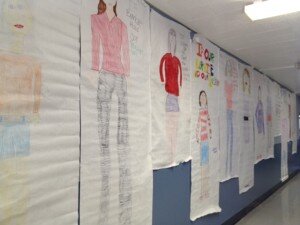
Below is one of the ten posters that will go up in our school’s cafeteria.

What my kids wrote in their reflections on this activity:
The Barbie was weird. Ms. Nguyen was right—Barbie does look like a freak in human form.
We did a life-sized Barbie and my group got "feet," so that meant she was super tall.
Also, that Barbie project was very fun but creepy at the same time. Barbie was freakishly disproportionate.
Our Barbie's feet were REALLY small.
We did a really fun project with Barbie. I learned a lot about proportions because of it.
People were really creative with their Barbie; our Barbie's name is LOLA! She is cute.
We worked on Barbie and it was weird because Barbie is so weird. My group messed up and now Barbie is messed up—it doesn't even look like Barbie.
We had an insane task! We had to see what Barbie looked like in human form and she's a FREAK! It was pretty fun to do though.
Barbie was a hard, hard, hard challenge. She is so tall. If we did her legs for our body part, it would be soooo long.
Updated 02/09/12